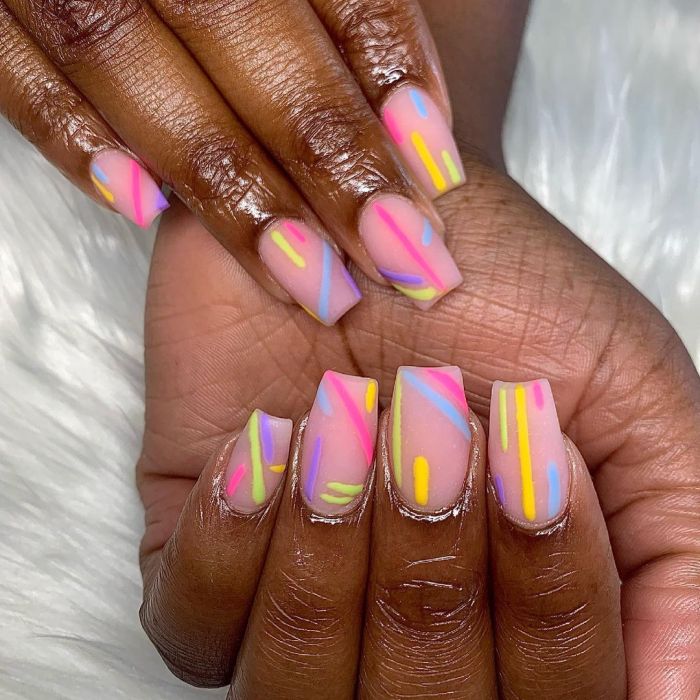
Festival Nails: Get ready to transform your fingertips into vibrant canvases of self-expression! This comprehensive guide dives deep into the hottest nail art trends, dazzling color palettes, and innovative techniques to create festival-ready manicures that are as unique as you are. We’ll explore everything from the inspiration behind each design to the best practices for maintaining your dazzling look throughout the festivities.
Prepare to unleash your creativity and make a statement with nails that perfectly capture the electrifying energy of any festival.
From bold, statement-making designs perfect for a music festival to delicate, nature-inspired looks ideal for a food festival, we’ll explore a range of styles, colors, and techniques. We’ll even cover the psychology of color in nail art and how to choose shades that best reflect your personality and the overall vibe of the event. This isn’t just about pretty nails; it’s about crafting a complete look that expresses your individuality and enhances your festival experience.
Maintaining Festival Nails

Festival nails are a fantastic way to express your personality and celebrate the vibrant energy of a festival. However, the excitement shouldn’t end with the application; maintaining your dazzling nail art is crucial to maximizing its impact and preventing costly touch-ups. Let’s dive into the strategies that will keep your festival nails looking fresh and fabulous for as long as possible.
Preparing Nails for Festival Nail Art
Proper nail preparation is paramount to achieving long-lasting festival nail art. Neglecting this crucial step can lead to premature chipping, lifting, and overall disappointment. Think of it as laying a strong foundation for a beautiful building – without it, the entire structure is compromised. The following steps ensure your nail art adheres perfectly and lasts longer.
- Shape and File: Begin by shaping your nails to your desired length and form using a high-quality nail file. Gentle, even strokes are key to avoiding splitting or weakening the nail. Aim for a consistent shape across all nails for a polished look.
- Buffing: Gently buff the surface of your nails to remove any ridges or imperfections. This creates a smoother surface for better adhesion of the nail polish and art. Avoid excessive buffing, which can thin and weaken the nails.
- Cuticle Care: Push back your cuticles gently using a cuticle pusher. Avoid cutting your cuticles, as this can lead to infection. Applying a cuticle oil afterwards will hydrate and nourish the surrounding skin, keeping it healthy and preventing hangnails.
- Cleanse: Finally, thoroughly clean your nails with a non-acetone nail polish remover to remove any dust or oils that might interfere with the adhesion of your nail art.
Maintaining Festival Nail Art
Once your stunning festival nail art is applied, the work isn’t over. Consistent maintenance is key to extending its lifespan and preventing those dreaded chips and smudges. Think of this as preventative maintenance for your car; regular checks and upkeep prevent bigger issues down the line.
- Top Coat Application: Apply a high-quality top coat immediately after applying your nail art and every 2-3 days thereafter. This protects your design from chips and scratches, preserving its vibrancy and longevity. Consider using a quick-drying top coat to minimize smudging time.
- Avoid Harsh Chemicals: Minimize exposure to harsh chemicals, such as those found in cleaning products. Wear gloves when washing dishes or cleaning to protect your nail art from damage and discoloration. This simple precaution can drastically extend the life of your manicure.
- Moisturize Regularly: Keep your nails and cuticles hydrated by applying cuticle oil or hand cream daily. This prevents dryness and brittleness, which can lead to chipping and breakage. Dry nails are more prone to damage.
- Gentle Handling: Be mindful of how you use your hands. Avoid activities that put excessive stress on your nails, such as aggressively typing or scratching surfaces. Consider wearing gloves for tasks that involve repetitive hand movements.
Addressing Potential Issues with Festival Nail Art, Festival Nails
Even with meticulous preparation and maintenance, certain issues might arise. Knowing how to address these problems promptly can save your festival manicure and prevent further damage. Think of it as troubleshooting – identifying and resolving the problem before it escalates.
- Chipping: Chipping is a common problem. Applying a fresh layer of top coat every few days is the best preventative measure. If a chip does occur, use a small amount of nail polish to carefully repair the area, then reapply a top coat. For more significant chips, consider a professional touch-up.
- Smudging: Smudging usually occurs while the nail polish is still wet. Using a quick-drying top coat can significantly reduce this risk. If smudging does occur, gently clean the area with a small brush dipped in nail polish remover before reapplying the design element.
- Lifting: Lifting occurs when the nail polish separates from the nail bed. This is often caused by improper nail preparation or inadequate application. If lifting occurs, carefully remove the affected area and reapply the polish, ensuring proper preparation beforehand.
Mastering the art of Festival Nails is about more than just applying polish; it’s about creating a personalized expression of your style and celebrating the unique energy of each event. By understanding the various techniques, color palettes, and embellishments available, you can confidently create stunning nail art that lasts. Remember, the key is to experiment, have fun, and let your creativity shine through.
So go ahead, embrace the vibrant world of festival nail art, and let your nails be the ultimate accessory to your unforgettable festival experience.